
Blog
My Art Fair Booth Setup
by Anne Kostecki

Since 2019, I have been working hard on improving my art fair booth.
I cannot even count the number of hours I have spent pouring over layout ideas, organizing prints vs. originals, figuring out the table(s) set up, pricing everything out, and of course, buying things I didn't end up using.
I always felt my layout was too crowded. My husband encouraged me to put all of my artwork up, saying that "you never know who needs to see the right painting to buy it." His logic made sense, but I couldn't shake the feeling that my walls were overwhelming, and lacked organization.
Initial Layout
Here is my old design: cover the walls with art, and have a 10' table down the middle with all of my stationery. I didn't like that I didn't have a space for transactions, or to sit comfortably while customers looked around. It felt too enclosed.
This wasn't my very first iteration... that was an embarrassing display from 2018 in which I just set up tables and randomly placed my unframed original art. It was for an indoor show, so I had no need for a tent. I couldn't afford panels or display racks, and I wasn't sure I wanted to do more art fairs, so I didn't invest in them.
I had a lot of art, and figured it was best to display everything, so that the right product would find the right buyer. I was concerned it would be overwhelming, but I didn't think I had enough "standout" work to fill the panels.
Second Iteration

I decided to remove the table in the center, and have 2 tables featuring artwork (and underneath would be extra storage). It cut those walls in half with available wall-hanging space, which wasn't good. I still didn't have a place for transactions, except at table corners, but I had a space to move in and out by opening up a side panel.
At this point, I felt like things were better but still not "best." The extra tables felt crowded, and they didn't have the right-sized tablecloths. People could not see the art up close, since the tables were in the way. And, I didn't like having unframed originals wrapped in plastic and crowding the available wall space. I had no idea how to display my tote bags, other than to sloppily post them on the panels (the bags were too heavy, and would often fall down).
Third Iteration
After thinking long and hard, I arrived at solutions! I decided to only include framed artwork on the walls.
I had a big project ahead of me: I needed to choose my best artwork, buy frames, and start framing all of it. I needed to map out my wall space to make sure it looked good.

I brought one of my panels downstairs (not an easy feat) and began laying out different framing options.


Once I was confident I had enough framed artwork (I actually had too much!), I began the task of figuring out how to set up the table, the unframed art, and the tote bags. I looked at a lot of example layouts from other artists on Google, Pinterest, and blogs. I sketched out possibilities, keeping in mind that everything needed to fit into a 10' x 10' booth.
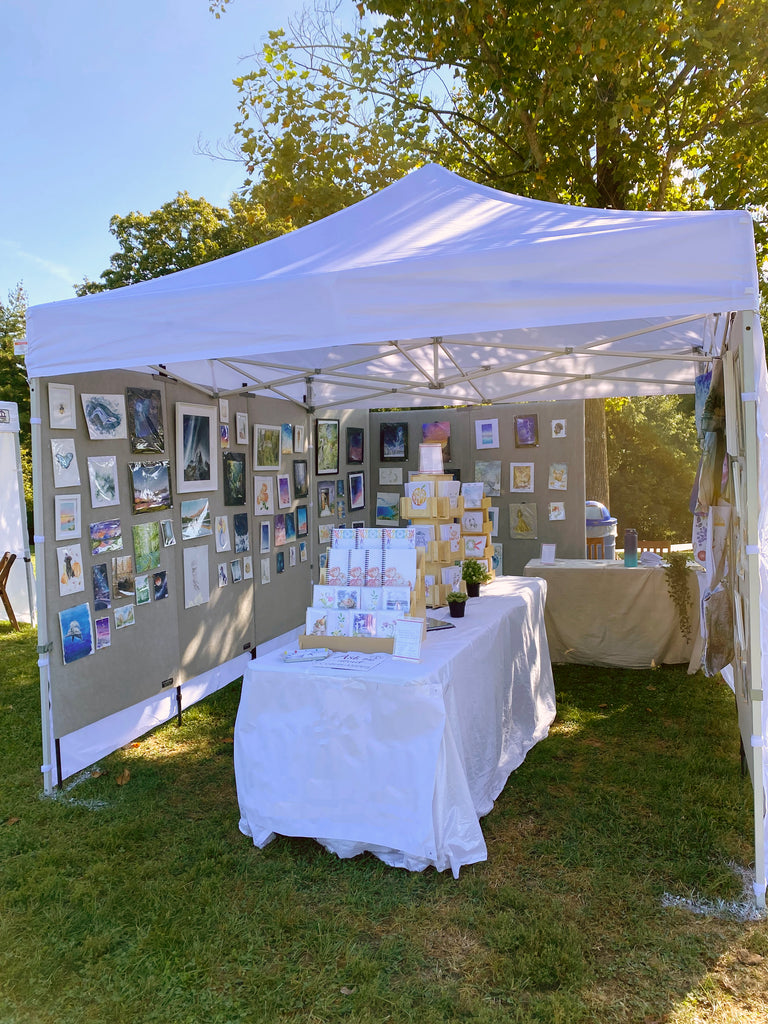
The New Booth Layout
My smaller, unframed originals will be in canvas print racks, easy for customers to page through. I also had a canvas rack for discontinued/on sale prints. I designed the layout so that it was more open in the center, and there would be an L-shaped juncture either facing the front or back, depending on the type of event.
I needed to make sure there was an opening for me to exit in the back, and it would also help with airflow/cooling in the summer heat. I would move the garment rack with tote bags depending on where the L-shape would be. I also had to get a small table for transactions (and for me to draw on during my downtime).
And, I bought a cheap garment rack from Target to display my bags on hangers. It's kind of tough figuring out where to put it, depending on the fair. I try to put it on the outside of my tent to draw people in.
Lighting was tricky a few years ago: I only had very weak battery-operated lights, but then I found some powerful LEDs from Lowe's that were only $15 each! I bought five, but I only needed four because they are so bright. I also bought some festive string lights ($20 per strand), but it turns out they are fragile, so I've already broken one, sadly.

I was under a larger tent, and due to the intense sun, I couldn't get a good photo during the day with proper lighting.


The booth at night, with my new (and inexpensive) light fixtures!
Conclusion
I'm continually trying to improve my booth setup, because I always feel like there's something I can do to improve my sales. I'm also trying to improve my setup because one of these days, I would love to win an award from the fair organizers! Some of these awards are quite a bit of money, and you often don't have to go through the jurying (or application fee) process.
I think that exclusively putting framed artwork on the ProPanels has helped, and the canvas portfolios also make the booth look more professional. I'm hoping to optimize the table setup, and figure out how to have a "tote bag" sign with the price listed in a natural way. Right now, it's held together with binder clips on a hanger.
I'm sharing this with you so that you know that these things are never easy! It's taken me years of reconfiguring, plus time and money invested, to set up my art booth. Doing events is a huge commitment, and it's never simple. I used to think that almost any artist or crafter could sign up for an event, show up and the sales just roll in. I have no idea why I thought this.
I hope that my retelling of my process can help you in some small way. And if you have any comments or input, please let me know in the comments! I would love to hear from you.


0 comments